ADP Pay eXpert, ADP Paycor and ADP Workforce Setup
HomeTrak Companion payroll can be interfaced with ADP Pay eXpert by means of a CSV file. HomeTrak Companion can be setup to create a CSV file of posted payroll. This CSV file is imported to ADP Pay eXpert for use in creating your company's ADP Pay eXpert payroll.
The ADP Pay eXpert interface must be set up in the Agency Office Module before it can be used. The 'ADP Pay eXpert/Paycor Setup' screen can be used for all three ADP packages. If you have any difficulties or questions please contact customer support for assistance.
Interface Setup:
In the Agency Office Module, click on the Settings tool in the Home tab and select Payroll Settings. Click on the Edit tool and select ADP Pay eXpert as the Primary or Secondary External Payroll Package. Click Save.
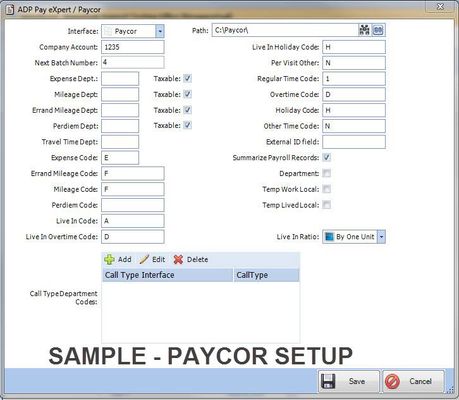
While still in the Agency Office Module, click Interfaces tool in the ribbon. Select ADP Pay eXpert/ Paycor Setup, then click the Edit tool to complete the setup:
If using ADP WorkForce
The interface for ADP WorkForce uses the same template as ADP Pay eXpert. When you click the Edit tool you will choose 'ADP Pay Expert' from the Interface drop-down list.
Earning and Deduction Department codes for mileage, errand miles, expenses and travel time must be entered in the appropriate fields.
There may be times when Workers' Compensation rates may vary depending on the different types of work (call types) your company provides. If your Workers' Compensation rates vary, you may need to utilize departments.
If your ADP representative has advised that you should use departments, then you will need to indicate this in HomeTrak Companion. To do so, check the Department check box. Use the Add, Edit and Delete buttons in this section to enter and maintain the Department Codes for the Call Types.
If the Department check box is blank, this indicates that you are NOT using departments, and department descriptions should NOT be entered in the Call Type Department codes section.
Caregiver Setup Requirements:
Additional setup is required on the caregiver records. The ADP Pay eXpert ID must be entered in the Caregiver's Profile in the Caregiver Module. In the External ID section, click the Add tool, add 'ADP Pay eXpert' in the Type field and the ID number in the Value field. Click Save.
| Field Name | Description |
|---|---|
| Path | The location where HomeTrak Companion will put the file it creates when the ADP Pay eXpert Export is run. The file that is created in this location will be named "C:\ EPI###YY.CSV" where ### is the first 3 characters of your company account number assigned by ADP Pay eXpert. The Company Account information for your office should have been entered in the ADP Pay eXpert Setup screen, and where the YY is the batch number that the system has automatically assigned for the batch when you complete an ADP Pay eXpert Export. |
| Company Account | Your company account number assigned by ADP Pay eXpert. Typically it is 3 characters in length. An ADP Pay eXpert Representative can advise you on your specific Account number. |
| Next Batch Number | Next Batch Number (you may need to populate this field with a batch number initally, but the system will increment the batch number by one whenever an ADP Pay eXpert Export is completed). |
| Earning and Deduction Codes | Earning and Deduction Codes must be populated for each item. You also need to indicate whether the item is taxable. Your ADP Pay eXpert Representative can assist you in determining what the code should be for each of the earnings and deductions. You will need to populate Earnings or Deductions codes for all items (Expense Department, Mileage Department, Errand Mileage Department, Perdiem Department, Travel Time Department, Expense Code, Errand Mileage Code, Mileage Code, Perdiem Code, Live In Code, Live In Overtime Code, Live In Holiday Code, Per Visit Other, Regular Time Code, Overtime Code, Holiday Code and Other Time Code) The earnings and deductions codes will consist of 3 characters the first being an 'E' to indicate it is an Earnings code or a 'D' to indicate a Deduction code and then the 2 character code for the item. Example: If Mileage is to be a deduction code, the code may be similar to 'DMI' or if Mileage is to be an earning code then the code might be something like 'EMI'. The codes may not be less than 2 characters and may not be more than 3 characters. If a user chooses to leave a field blank, the system defaults to "E1" for the code, which is the ADP Pay eXpert default for regular pay. HomeTrak can accept both alphabetic and numeric entries in the 3 digit code. Consult with ADP Pay eXpert if you need additional information on the Earning and Deduction Codes. |
| External ID Field | HomeTrak Companion will look at the External ID's on the caregiver's profile for the ADP Pay eXpert External ID; it can't be left blank, This id must be 6 digits. |
| Summarize | If the Summarize Payroll records checkbox is selected, the system will summarize rate records for the caregiver if the rates are the same. |
| Departments | Check the box to use Departments. If you are using Departments you will need to populate the appropriate Department for each Call Type in the Call Type Department Codes: portion of the ADP Pay eXpert setup screen. Your ADP Pay eXpert Representative can assist you in determining if you need to use Department codes and what they should be. |
| Call Type Department Codes | If you choose to use Departments, enter the appropriate Department for each Call Type. Use the add, edit and delete options in this area of the screen to populate the appropriate departments for your Companion call types. If your workers compensation rates vary for the types of work your caregivers do, you may need to utilize departments. If your ADP representative has advised that you should be using departments then you will need to indicate that you will be using departments within ADP Pay eXpert setup screen, by insuring that the Department indicator is selected. |
| Temp Work Local | Temp Work Local is normally left blank but can be checked if applicable. Your ADP Pay eXpert representative can advise. |
| Temp Lived Local | Temp Lived Local is normally left blank but can be checked if applicable. . Your ADP Pay eXpert representative can advise. |
| Ratios | Select the appropriate Ratio for Hourly, Per Visit and Live In items. Indicate if you want the items to show in Pay eXpert as hours or as a single unit. |
Running the Interface to ADP Pay eXpert program
After the required setup is completed, you will see an Export to ADP Pay eXpert tool at the top of the Payroll Module screen. Click the tool to initiate an export of your posted payroll.
When you click the 'ADP Pay eXpert' tool, a CSV file will be created called "C:\ EPI###YY.CSV" where ### is the three-character company account number assigned by ADP Pay eXpert that was entered in the Setup Interface Information Screen, and where the YY is the batch number.
Once the file is created the user can import the file into ADP Pay eXpert for use in the ADP Pay eXpert payroll. ADP can assist you in the how to get the information into ADP Pay eXpert.
HomeTrak recommends the export from HomeTrak be performed on the same machine that has ADP Pay eXpert installed.